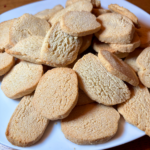
Crunchy Vanilla Almond Flour Snack Cookies
These crunchy vanilla almond flour cookies are the perfect grain-free snack! Made with simple ingredients like almond flour, honey, and coconut oil, they’re easy to bake and versatile enough for flavor variations.
Ingredients
- 2½ cups almond flour
- 2 tbsp coconut flour
- ½ tsp baking soda
- ¼ tsp salt
- ½ cup honey
- ¼ cup coconut oil - butter can be subbed
- ¼ cup cocoa butter
- 1 tsp vanilla extract
Instructions
-
Add almond flour, coconut flour, baking soda, and salt to large mixing bowl
-
Combine and set aside
-
Add honey, coocnut oil, and cocoa butter to small saucepan
-
Stir over medium-low heat for a few minutes until everything is melted (don't let it boil)
-
Remove from heat
-
Pour the honey mixture into the dry ingredients
-
Add vanilla extract
-
Stir to just combine
-
Use an electric mixer on medium speed to thoroughly combine the dry and wet mixtures - it will be crumbly
-
Use your hands to form the dough into a ball
-
Split ball into two equal parts
-
Form one ball into a one-inch log on a sheet of wax paper
-
Roll the dough up in the wax paper and fold the edges so it is closed
-
Repeat with the other half of the dough
-
Place the wrapped dough in the refrigerator for at least two hours and up to 24
-
When you are rady to bake, preheat the oven to 350℉ / 180℃
-
Line your bbaking sheet with silicone liner or pachment paper
-
Get one log of the dough out of the refrigerator
-
Unwrap and slice dough into ¼-inch pieces
-
Place slices about an inch apart on lined baking sheet
-
Bake for 8 - 10 minutes until cookies are slighly firm to the touch and lightly browned around the edges. IMPORTANT - cookies will be soft when they come out of the oven and the crisp as they cool. Don't overbake them. They should be a little soft, but not doughy to the touch. Press lightly with your finger, if it just makes a soft dent, the cookeis are ready, if it makes a deep dent, they are too soft. Put back in the oven for one to two minutes.
-
Let cookies cool on pan for about two minutes before moving to cooling rack
-
Carefully slip a spatula under a cookie. If you can easily lift it without it crumbling, it's ready for the cooling rack
-
Cool cookies on rack until completely cool - they will be crunchy at that point
-
Repeat with second dough log. I like to havre two baking sheets prepared so you can put the second batch in while first batch it cooling on the pan. It's best to have cold dough on a cold pan if possible.
-
For best texture, store cooled cookies in air-tight container in the freezer